Here we are on day 5 of my series about foods for brain health and you may be wondering why I took so long to get to todays tasty little number – cocoa. Continue reading “7 foods to support brain health no. 5 – cocoa!”


Eat food you love that loves you back
Here we are on day 5 of my series about foods for brain health and you may be wondering why I took so long to get to todays tasty little number – cocoa. Continue reading “7 foods to support brain health no. 5 – cocoa!”

One of the challenges of using food as medicine is sometimes you feel like you’re missing out. Especially when it comes to desserts – or at least that’s my weak point! When I first changed to a dairy-free diet, I found eating out with the family particularly difficult. Continue reading “Chocolate raspberry custard pots”

I’ve always been a bit partial to a slice of deliciously creamy cheesecake. Before I went dairy-free and plant-based my favourites were the ones you could buy frozen (I never tried to make my own!). Super-sweet crunchy biscuit base, thick and creamy filling then finished with a colourful layer of blackcurrants or strawberries, coated with more sugar of course. It hit all the pleasure buttons in one go!
When I went dairy-free, cheesecake was off the menu until I discovered the raw version – not quite so super-sweet but still delicious. I loved experimenting with different flavours – there are two amazing ones in my new book Eat Well Live Well with The Sensitive Foodie that are a winner every time. Continue reading “Strawberry and chocolate ‘cheesecake’”

One of the main themes threading through my courses and workshop is the importance of eating a rainbow every day – a fresh produce based one not a skittles one (as on that rather surreal advert)! People are sometimes surprised when I include brown on the rainbow, but in the world of powerful, colourful phytonutrients, brown is good, especially when it comes in the form of chocolate.
Before you jump for joy, that’s not all types of chocolate, sorry! For the more chocolate, or cacao, is refined and processed, the more it loses its magical properties and can end up as harmer not healer. Raw, unrefined cacao powder is packed with a group of helpful phytonutrients called polyphenols. There’s been a lot of research recently about this group as they appear in many of our favourite ‘treats’ like coffee and red wine, and supplement companies are researching the best ways to capture their magic and put it in pill form. I still believe the best way of getting them is through eating a wide range of wonderful, fresh plants (but then I would!).
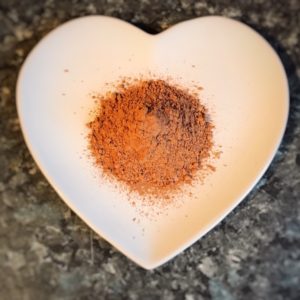
It’s the flavanols in cacao which are particularly good, working together as a team. It appears they have some anti-inflammatory effects, soothing the body which can only be good in our hectic, stressful lives. Flavanols also improve blood flow, are good for heart health and possibly for brain health too, for better blood flow in the brain means more oxygen and nutrients get delivered and harmful by-products whisked away more rapidly before they can get up to mischief.
Heat reduces the beneficial flavanol content by up to 60%; cocoa powder is heated and refined as are most chocolate products. Adding sugar, refined fats and dairy products changes it again, each step making it less helpful. But it also tends to make it more palatable, and a sugar/fat combo hits our pleasure centres, which is why a chocolate bar tastes so good!
Raw cacao powder can be quite bitter; these chocolate brownies solves that problem by mixing it with dates and nuts, making it super rich and delicious instead. And because there’s no baking involved, the cacao keeps its nutritional properties, and gains a few more along the way from the other ingredients. I love it when cake is a health food!
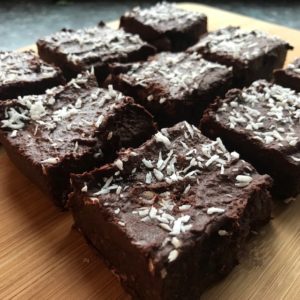
A word of warning – these chocolate brownies are not cheap to make nor low in calories, but because they are so dense and packed with fibre, they’re incredibly filling and you can only manage a small amount at a time. They also freeze well, so you can make a batch and pop some away for another day. If you don’t have any cacao nibs, feel free to leave them out. They add texture and a little extra chocolatiness, but are not essential.
So if you feel like indulging in some chocolate loveliness, why not give these a go? Your body and your tastebuds will be delighted! And don’t forget to let me know how you get on.


It seems that you, dear readers, have a sweet tooth. Whenever I post a recipe for cake or dessert, I get lots more website visits than a savoury day. So I think this recipe on day 10 of my Sensitive Foodie Advent Calendar will please you greatly. Continue reading “Raw chocolate brownie bites”
There are times when only chocolate will do. But when you’re eating dairy free, you can’t just grab the first bar you find. Then if you’re eating gluten free and want to cut out the junk and eat more whole food, then things get even more complicated. By the time you actually find something that meets the criteria and hits the spot, life has moved on and you don’t really want it anymore! Which is great for the waistline, but frustrating for the tastebuds! Or worse, you succumb and eat something that makes you feel dreadful.
 There are more and more dairy free chocolate brands available to buy, usually in the supermarket free from section or a health food shop, but they can be expensive and you don’t really know what’s in them.
You could make you’re own chocolate of course – something that I do want to do. I even have a friend who teaches it, but still haven’t made it to a class. Fortunately, I have an easy solution to chocolate bar frustration that’s really quick to make and tastes amazing – chocolate refrigerator chunks.
The recipe of these came together after I was bought a solid chocolate ‘cake bar’ from a healthy food stall – a long, mars bar sized chunk filled with nuts and dried fruit. Having not consumed a decent chocolate bar for a number of years, it was quite a revelation, but so rich and filling that I couldn’t finish it all, despite a seriously concerted effort. Having made great changes to the way I eat, it really was just too much for me – shocking!
Whenever I munch my way through a new food or dish, I’m always analysing it’s make up and trying to decide how to recreate it myself. Realising that this would be simple, I grabbed the dairy free chocolate drops and got to work.
Chocolate refrige rator chunks
250g dairy free chocolate
2 tablespoons coconut oil
250g of chopped nuts, seeds and dried fruit
(my favourite combo is pecan, raisin, cranberry, pumpkin and flaxseed)
Pop the dairy free chocolate and coconut oil in a medium sized bowl. Place it over a small pan of simmering water and stir whilst it melts to combine. Remove from the heat and stir in the nuts, seeds and fruit combo you’ve chosen – mix well.
Tip the mix into a prepared tin (*see below), cover with a freezer bag and place in the freezer for a couple of hours to set hard. Remove from the freezer, tip out of the tin onto a board and chop into chunks (careful of your fingers though as it’s pretty hard). Place chunks into a pot and leave in the fridge until you’re ready to eat them (if you manage not to eat them all during the chopping process). Enjoy!
*I have found that disposable flan dishes are the best mould to use, and as it’s easy to remove when frozen, you can reuse them a number of times. If you don’t have any, just line any tin with foil to help you remove it later – don’t use cling film though, unless you want it as part of your chocolate chunk

Easter has many meanings. There’s the religious one, naturally. Or the start of spring and new life. Or – for many – chocolate! It’s estimated that 80 million chocolate Easter eggs are sold per year, and that’s in the UK alone. Continue reading “Chocolate and coconut tart”
It may have been noted that I am rather partial to a bit of cake. Always have been, probably always will be. And although I have definitely cut down on my processed sugar intake in recent years, particularly since adopting a whole food plant based diet, I do still like a decadent sweet treat every now and then.
And one of my biggest concerns when going dairy free was how was I ever going to get a decent cake again? Adding on egg free as well to make it free from any animal products, seemed even more challenging. Fortunately, there are a huge amount of free from recipes out on the internet and in specialist cookery books. And what’s more, it’s actually easier to make a deliciously light and fluffy vegan cake than your standard one.
Following the clear guidelines set out by MsCupcake (check out http://www.mscupcake.co.uk/books/ for her recipe book), there are three key elements to making a great vegan cake:
My son has definitely inherited my love of cake, along with my intolerance to dairy. It was his 16th birt hday just before Christmas, and so to celebrate I decided to make him a huge, sumptuous dairy free birthday cake. And as he loves a bit of chocolate, it turned into the ultimate triple layer chocolate delight.
Consisting of three cake layers – a chocolate chip sponge sandwiched between two chocolate sponges – and covered with a rich chocolate cream, finished with a garnish of chocolate strands, it was enormous! Being dairy free, it was not over rich but still gave great chocolate satisfaction
I adapted this recipe from MsCupcakes Neapolitan sponge cake and it worked really well. It can be made gluten free by using non-wheat flour (make sure your baking powder is gluten free too). And remember this cake is huge, so it provides a good amount of servings (unless it’s for a group of giant-boy 16 year olds, then it disappears extremely fast!
Triple layer chocolate cake
For the chocolate chip layer:
200g self raising flour
200mls non-dairy milk
80ml flavourless oil (I use organic rapeseed)
1 tablespoon vanilla extract 50g non-dairy chocolate chips
For the chocolate layers:
340g self raising flour
>4 tablespoons cocoa powder
200g caster sugar
2 teaspoons baking powder
400ml non-dairy milk160mls oil
2 tablespoons vanilla or 1 each of vanilla and chocolate extract
To finish, chocolate buttercream (see below) and chocolate strands
First, you will need three round cake 23cm cake tins, greased and base lined with greaseproof paper. Preheat the oven to 180oC.
Make the chocolate chip layer first. Mix together the flour, sugar, baking powder and chocolate chips into a large bowl. In a separate bowl, mix the oil, milk and vanilla extract. Pour the wet ingredients into the dry and stir together until just combined. Do not over mix – there should be a few lumps still. Tap the bowl on the work surface (this stops the raising agents working too quickly). Pour the mix into one of the prepared tins, and then tap the tin on the work top.
Repeat the same process for the chocolate layers, mixing the dry and wet separately then combining the two quickly and pouring into the other two tins. Try to make sure you distribute evenly and remember to tap your tins.
Bake the layers for 18-22 minutes, but check after 15 if you have a fan oven as they can cook quite fiercely. Pop a toothpick into the centre of each layer – once it comes out clean then the layer is ready. Some layers may take longer than others depending on their position in the oven. Once you are happy the layer is cooked, remove from the oven and leave to cool in the tin for 10 minutes, then tip out onto a cooling tray and leave to cool completely.
Dairy free chocolate buttercream
To finish off your mighty fine cake, you will need to make up a quantity of chocolate buttercream. Even though it contains no butter, this cream is still seriously rich and sweet, the perfect accompaniment to this super chocolate cake.
5 tablespoons of non-dairy spread (I used Vitalite)
5 tablespoons of vegetable fat (I used Trex)
500g icing sugar
100g cocoa powder
Up to 100mls non-dairy milk
1 tablespoon of chocolate extract if you have it, if not vanilla.
Put the non-dairy spread, vegetable fat and extract into a large bowl and whisk with an electric hand whisk until well combined and creamy. Add the cocoa powder, half the icing sugar and half of the non-dairy milk. Mix together, slowly at first otherwise you will get an icing sugar cloud! Once well combined, add the remaining icing sugar and enough non-dairy milk to get the consistency you want. It needs to be thick enough to spread and stay on the side of the cake, but not so thick you can’t spread it around easily.
Place your three cakes next to each other, base side up. Spread a good dollop of chocolate butter cream on one of the chocolate layers and place the chocolate chip layer on top of it. Put a good dollop of buttercream on this layer, then place the other chocolate layer on top. Finally, put another good dollop of the icing on top of the chocolate layer and spread it out so you have a thick coating, then use the rest to coat to fully cover the sides. Very carefully, transfer the cake onto it’s serving plate, and sprinkle with chocolate strands and decorations as required.
Enjoy your celebration, as well as your seriously chocolatey cake. It’s so delicious, unless you tell anyone, they won’t know it’s dairy free and vegan!
100g caster sugar
I have a great belief that there’s always a time and a place for cake! I’ve always had a sweet tooth, and cake to me is the ultimate comfort food. Any type is good (except coffee cake – yuck!), but I do have a particular penchant for a might fine cupcake.
Cupcakes have really been in fashion over the last few years, and it’s not difficult to see why – the recipes tend to be simpler than a whole cake, take less time to cook and you can have variety and creative fun with one batch of mixture. A phenomena originating in the States, cupcakes have actually been around since the end of the 18th century, although their popularity really kicked in at the beginning of the 21st. There’s two theories about the name – that they were originally baked in cups, or because the ingredients were measured in cups as opposed to weight. Either way, cupcakes are definitely superior to our little fairy cakes!
Of course, eating a plant based diet means no eggs, one key ingredient to the standard cupcake recipe. But does this mean then end to cupcake delights? Thankfully not!
We have a baking guru in our house – Ms Cupcake! She has the most delicious recipes, along with other larger cakes, that never fail to produce gorgeously light, melt in the mouth cupcakes. And I have to say that my daughter makes much better cupcakes than I do – or maybe cake just tastes better when someone else has made them!
Vegan cupcakes are actually much simpler to make than standard ones – it’s just a matter of mixing up your dry ingredients, then your wet and finally combining them together in one big whoosh. There’s no creaming or delicate stirring – in fact, over stirring is a definite no no as it overworks the gluten in the flour, making the cake heavy and dense. A lightly stirred batter results in light, fluffy cakes, no need for the leavening action of eggs.
Eggs also act as a binding agent; curdled milk also works well, that’s dairy free milk of course! Most of Ms Cupcakes recipes use cider vinegar to sour the milk; that doesn’t work for me unfortunately as due to my yeast sensitivity, I have to avoid fermented items. Lemon juice works as well, and gives a slightly tart contrast to the super sweet cakey flavour.
My daughter is often found whipping up a batch of these chocolate cupcakes and I have to say they are amazingly light and delicious, so much so I bet you might even prefer them to the standard cholesterol laden butter version. The recipe is pretty much the same as Ms Cupcake with a couple of slight alterations, but still completely dairy free and seriously delicious – give them a go and see what your tastebuds think. And just a little thought to leave you with – there’s a mint choc chip cupcake which is just amazing…..
Chocolate cupcake (enough for 12 large cupcakes)
200ml non dairy milk
2 teaspoon cider vinegar/lemon juice
170g self raising flour/gluten free SR flour
30g cocoa powder
200g caster sugar/150g coconut sugar
1/4 teaspoon salt
1/2 teaspoon baking powder
80ml olive oil
1 tablespoon vanilla essence
Buttercream icing
75g dairy free margarine (e.g. Pure, vitalite)
1teaspoon vanilla essence
375g icing sugar
20-30mls dairy free milk
Preheat the oven to 180ºC and get your muffin tins lined with cupcake wrappers. In a small bowl, mix the non-dairy milk and vinegar/lemon juice together and put to one side for 10 minutes to let it curdle a bit. In the meantime, get a large bowl and mix all the dry ingredients together until well combined. Add the curdled non-dairy milk oil and vanilla and mix together with a metal spoon really quickly (about 10 seconds) until just combined – it will be a bit lumpy.
Tap the bowl on the worktop to release the bubbles and stop the raising agents working too quickly then dollop the mixture into the cupcake cases, distributing equally. Pop the trays in the oven and bake for 15 minutes or so. Remove from oven and lay on a cooling tray until they are completely cold.
In another bowl, whisk the margarine and vanilla essence together until creamy then add half the icing sugar. Once well mixed, add the second half and mix well, adding a little dairy free milk to soften if too stiff. Decorate the cupcake tops with the icing and sprinkles of your choice.
As a child, I was never that bothered about chocolate. Not that I didn’t like it (there can’t be many than don’t) but my pocket money would go on sweets and candies rather than chocolate treats. Fortunately, I’ve never been plagued by chocolate cravings like many I know, but I do appreciate there are moments when only chocolate will do!

Once I became dairy free, my chocolate intake dropped to almost nil, as I only really like milk chocolate, and the only dairy free alternatives I found were carob bars. I tried it once. And only once!
Fortunately, there are more and more dairy free chocolate alternatives around. There were so many free samples on offer at last year’s Vegefest, I can say I was truly chocolate-stuffed by the end of the day. And many of these are now available in supermarkets, which does make life rather easy.
One chocolate dessert I’ve always had a passion for, though, is chocolate mousse. Decadently rich yet beautifully light and airy, its a pudding that you can savour teaspoon after teaspoonful. Not good for your hips, but a delight on your tongue and worth the extra workout the next day!! Recently, I had a sudden urge for a chocolate mousse so decided to find a dairy free version – and I have to say this works so much better than I could have hoped.
It’s really quick and easy and tastes stunningly chocolaty. As tofu is used to replace the double cream element, it’s much healthier too as it’s low in saturated fat, although go easy on the agave syrup as this sweetener will rack up the refined sugar content some what. Although marketed as a healthy alternative to refined sugar, agave is just as processed and can even have a higher sugar content than the nasty high-fructose corn syrup that’s added to so many processed cakes and pastries. Mind you, this IS a chocolate pudding, so has to have a little devilish nastiness to it!!
Dairy free chocolate mousse
350g silken tofu
170g dairy free chocolate
3/4 tablespoon agave syrup
1 teaspoon vanilla extract
pinch salt
fresh berries/berry coulis to serve
First, melt the chocolate in a clean bowl over a pan of simmering water. Leave to cool slightly. Meanwhile, drain and dry the tofu and puree in a blender or food processor until smooth. Add the melted chocolate, agave syrup, vanilla essence and salt and blend again until smooth and well m
ixed. Spoon out into four individual ramekin dishes and chill in the fridge for 1 – 2 hours or until set. Serve with whole fresh berries or a berry coulis and enjoy your divine chocolate treat!